Word 2010 Line spacing

How to Set Line Spacing in Word 2010, Word 2013

In Word changing the line spacing in a Word 2010 document inserts extra space between all lines of text in a paragraph. Because Word adds the space below each line of text in the paragraph, the last line in the paragraph will also have a little extra space after it in the package.

Setting line spacing

We can easily change the line spacing in the current paragraph or all the paragraphs you've selected as a block:
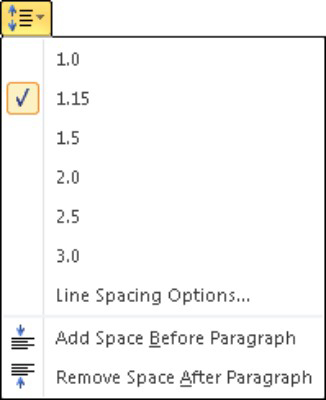
  1. Click the Line Spacing command button.

    Word Line Spacing
    Word Line Spacing


    A menu listing common line-spacing commands appears.
  2. Choose a new line-spacing value from that list.
    The line spacing for the current paragraph or selected paragraphs changes.
Word sets line spacing at 1.15 as its standard, or default. Supposedly, that extra .15 lines of text makes text more readable than using single spacing, or 1.0. In double spacing, or the line spacing value 2.0, one line of text appears with one blank line below it. Triple spacing, 3.0, makes one line of text appear with two blank lines below it.
Ah! The keyboard shortcuts:

  • Single-spaced lines: Press Ctrl+1.
  • Double-spaced lines: Press Ctrl+2.
  • 1-1/2-spaced lines: Press Ctrl+5.
    Use the 5 key on the typewriter area of the computer keyboard. Pressing Ctrl and the 5 key on the numeric keypad activates the Select All command.
There’s no such thing as having no line spacing. If you want to "remove" fancy line spacing, select some text and press Ctrl+1 for single spacing.

Setting specific line spacing options

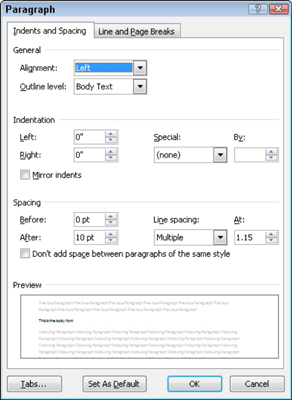
Now to set the line spacing to a value other than the items shown in the Line Spacing button's menu, you summon the Paragraph dialog box.

image1.jpg

We see in the Spacing area of the dialog box, the Line Spacing drop-down list lets you set various line-spacing values: Single, 1.5, and Double, just like the Line Spacing command button menu.
Additional options in the Line Spacing drop-down list require you to also use the At box. Values you set in the At box indicate line spacing:
  • At least: The line spacing is set to the specified value, which Word treats as a minimum value. Word can disobey that value and add more space whenever necessary to make room for larger type, different fonts, or graphics on the same line of text.
  • Exactly: Word uses the specified line spacing and doesn’t adjust the spacing to accommodate for larger text or graphics.
  • Multiple: This option allows you to enter line-spacing values other than those specified in the drop-down list. For example, to set the line spacing to 4, select Multiple from the Line Spacing drop-down list and type 4 in the At box.
Now click the OK button to confirm your settings and close the Paragraph dialog box.
 

Word Paragraph Spacing

Paragraph Spacing in Microsoft Word 2007, 2010 and 2013

Run Word 2007/2010/2013, click the "Home" tab on the ribbon and navigate to the "Change Styles" item under the Styles options. And then click this item, there will pop up a drop-down menu, in which the "Paragraph Spacing" is at the bottom obviously. Point to the "Paragraph Spacing" item in the menu, and a Built-In dialog will appear, where we can edit, set and custom Paragraph Spacing on word 2010.

Word 2010 Paragraph Spacing


Word 2010 Mail Merge

Word 2010 Mail Merge

This Word 2010 includes Mail Merge feature, which enables user to create documents (Letter, Emails, Fax etc) that are essentially the same but contains unique elements such as recipient Name, Address, Contact No, City, State, etc. It helps user to create a document for multiple recipients more easily by just selecting recipient names and choosing the document. Personal details of the respective recipient will be automatically added in the document which prevents users to write each recipient’s personal info in every document, eventually saving a lot of time. This post will cover how to use this feature through a simple wizard steps.

Now Launch Word 2010, navigate to Mailings tab, and from Start Mail Merge options, click Step by Step Mail Merge Wizard.

new

This action will bring up Mail Merge dialog at the side of the Word document window, here you can specify type of document you want to create, we will select Letters, click Next:Starting document from the bottom of the dialog.

choose letter

In this procedure, you will be provided with different options to create Letters, we will choose simple procedure by selecting by template. Click Select template.

choose templae

That will bring up Select template dialog, choose a suitable template. We will be using Median Letter template. Click OK to continue.

select temp

In the left side of the window you can see the template is imported into document, from right-pane, click 
Next: Select recipients.

select recipients

By this step, you can choose different options to import recipient list, we will select an existing list, hit Browse to import desired recipients list.

browse recpient list

We are will be using recipients list created in Excel 2010. The name of the worksheet is Mail, which we will import in to Word Mail Merge.

excel sheet

Choose an Excel worksheet, click Open to import.

mail list xlsx

Select Table dialog will appear, now choose the worksheet which contains required data, if first row contains column headings, then enable First row of data contains column headers option, and click OK.

choose sheet mail

We will see the Mail worksheet in the Mail Merge Recipients dialog. Here you can filter down the recipients on the basis of column headings. If we want to send letters to the recipients living in city Akron. We will select Akron from City drop-down options.

select city

While click, it will show only the recipients living in Akron. Here you can also perform different actions over the list such as; Sort, Filter, Find duplicates, Find recipients, and validate address. Click OK to proceed further.

city selected
 
As now navigate to Mailings tab, and click Address Block.


address block 1

We will reach Insert Address Block dialog, from Specify address elements, choose format in which you want to show recipient name. Under Preview you can see the preview of the changes that affects. Under Correct problems, click Match Fields to insert new field in the letter, as we want to include address of the

recipient.
Address block 1 1

Match Fields dialog will appear, now from Address 1 options select Street. That will include the name of the street. You can also include other fields if required. Click OK to continue.

street

You will see the address is added in to the format as shown the screenshot below. Click OK to continue.

address added

Now we will customize the greeting message, for that navigate to Mailings tab, and click Greeting Line.

address block greeting

In the Insert Greeting Line dialog, you can choose desired greeting format from Greeting Line format. Under Greeting line for invalid recipient names choose the format for unknown recipients. Under Preview, it show the preview of of the changes you made. Click OK to continue.

choose greeting

Now to make AddressBlock more prominent, navigate to Home and apply color and font styles over it.

customize 1

Navigate to Mailings tab, and from Finish & Merge menu, click Edit Individual Documents.

mailings tab 1

It will bring Merge to New Document dialog, you can choose Current record, we will select All to view all the recipients. Click OK to show the letter of each recipient.

merge all

Now as you can see in the screenshot below, Mail Merge created letters of each recipients residing in city Akron with their respective street names.

letters 1
letters all

By using Mail Merge, we can also create:
  • A set of labels or envelopes: The return address is the same on all the labels or envelopes, but the destination address is unique on each one.
  • A set of form letters, e-mail messages, or faxes: The basic content is the same in all the letters, messages, or faxes, but each contains information that is specific to the individual recipient, such as name, address, or some other piece of personal data.
  • A set of numbered coupons: The coupons are identical except that each contains a unique number.
 

Word Tutorial

Word Tutorial: Control bullets in Word 2007 and Word 2010

Controlling bullets, don't use the bullets button on the ribbon. That will drive you crazy. Instead, create a list style to manage the bullets, and then apply the built-in paragraph styles List Bullet, List Bullet 2, List Bullet 3 etc to your text. It's actually not hard to do this, once you get the hang of it. After you've done this a couple of times it will take less time to set up your bullets than it will to read this article.

Reason to use more than one List Bullet style.

Word has five built-in paragraph styles named List Bullet, List Bullet 2, List Bullet 3 etc.
We're going to use the List Bullet paragraph style for bullets that begin at the far left. Bullets that have to be indented use List Bullet 2. Bullets that are indented a bit more are List Bullet 3. Etc. Like this:
  • Level one bullets use style List Bullet
    • Level two bullets use style List Bullet 2
      • Level three bullets use style List Bullet 3
        • Level four bullets use style List Bullet 4
          • And finally, level five bullets use style List Bullet 5
 How to create a new list style

To create your list style, on the Home tab, in the Paragraph group, click the Multilevel list menu and choose Define New List Style (Figure 2).

Word Tutorial
Word Tutorial


On the Multilevel list menu, choose the Define New List Style option.

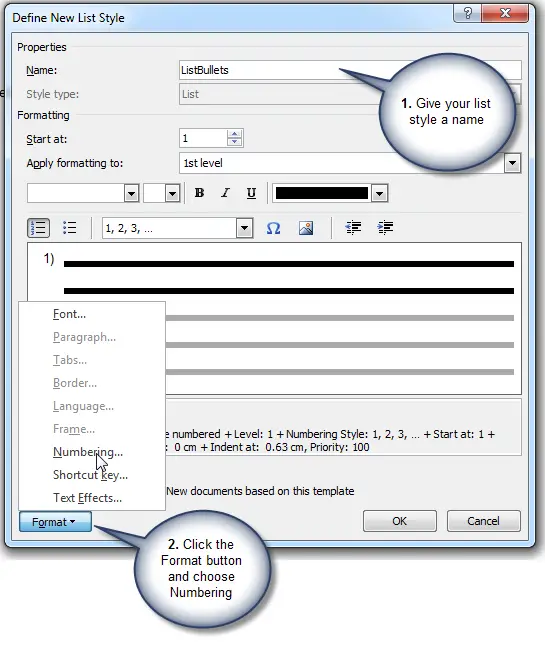
In the Define New List Style dialog (Figure 3), do (only) two things:
  1. Give your list style a name.
    Hint: Give it a plural name. That makes it clear that this is a list style that's controlling more than one paragraph style. And, give it a name directly related to the paragraph styles you're going to use. We're going to use paragraph styles List Bullet, List Bullet 2, List Bullet 3 etc. So I suggest naming the list style as ListBullets.
  2. On the Format menu, click Numbering. (Why 'Numbering' when we're dealing with bullets? Because to Word, bullets and numbering are inextricably linked.)
In the Define New List Style dialog, give your style a name and then click Format and choose Numbering

In the Define New List Style dialog, give your list style a name and then click Format > Numbering
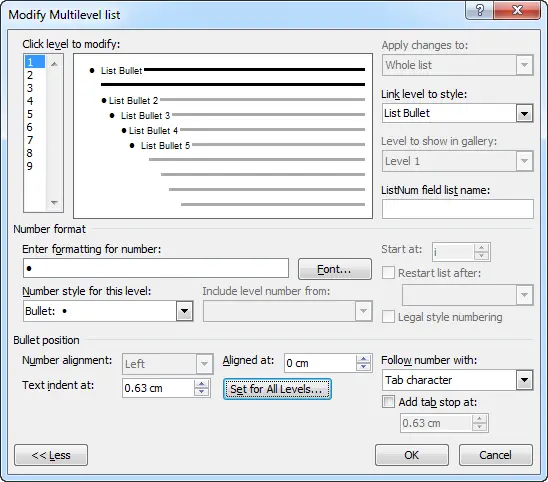
We're now in the Modify Multilevel List dialog box (Figure 5). The list style is the co-ordinating mechanism for the whole "set" of paragraph styles we'll use. So we set up all levels of bullets in this one dialog box.
For the simplest set of ordinary bullets:
  1. In the Modify multilevel list dialog, click the More button.
  1. Attach the List Bullet paragraph styles to the first 5 levels in the list style. To do that:
    1. In the 'Click level to modify' list, select level 1. In the 'Link level to style' box, choose List Bullet. That attaches paragraph style List Bullet to level 1 of the list style.
    2. In the 'Click level to modify' list, select level 2 and attach style List Bullet 2. And attach List Bullet 3 to level 3, List Bullet 4 to level 4 and List Bullet 5 to level 5.
      (Keyboard users will experience a bug in this dialog box that's been there for 10 years or more: if you use the keyboard to attach your styles, typing the names of the styles as you go, you'll have to go back and re-attach List Bullet to Level 1).

  2. Now we tell Word about the bullets: round? square? arrows?
    1. In the 'Click level to modify' list, click level 1. 'In the Number style for this level' box, scroll down the list and choose the bullet you want.
    2. In the 'Click level to modify' list, select level 2. And choose your bullet for level 2. And so on down to level 5.
    3. For each of levels 6 to 9
      1. choose the level in the 'Click level to modify' list
      2. set the 'Number Style for this level' to "(none") and
      3. delete anything in the 'Enter formatting for number' box.

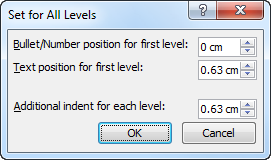
  3. The default indents are actually quite reasonable. If you prefer to change them, then you have two choices. The easy way is to click the "Set for all levels" button. You'll see the Set for All levels dialog


Use the Set for All levels dialog to manage indents for your bullets
The hard way is to set the 'Aligned at', 'Text indent at' and 'Add tab stop at' boxes individually. Just remember that they're all measured from the margin.

My finished settings look like the Figure

The Multilevel List dialog when it's finished

The finished settings in the Modify Multilevel List dialog

OK, OK back to your document.
 

PowerPoint Keyboard Shortcuts

PowerPoint 2010 Keyboard Shortcuts

PowerPoint Keyboard Shortcuts
New PowerPoint 2010 offers a number of helpful keyboard shortcuts for performing tasks quickly. These are some shortcuts for common PowerPoint formatting, editing, and file and document tasks. Additionally, after you have created your masterpiece, you can use a number of shortcuts when running your slideshow.
 
PowerPoint 2010 Formatting Shortcuts
Command Shortcut Ribbon Location
Bold Ctrl+B Home tab, Font group
Italic Ctrl+I Home tab, Font group
Underline Ctrl+U Home tab, Font group
Center Ctrl+E Home tab, Paragraph group
Left Align Ctrl+L Home tab, Paragraph group
Right Align Ctrl+R Home tab, Paragraph group
Justify Ctrl+J Home tab, Paragraph group
Normal Ctrl+spacebar Home tab, Paragraph group
 
PowerPoint 2010 Editing Shortcuts
Command Shortcut Ribbon Location
Undo Ctrl+Z Quick Access toolbar
Cut Ctrl+X Home tab, Clipboard group
Copy Ctrl+C Home tab, Clipboard group
Paste Ctrl+V Home tab, Clipboard group
Select All Ctrl+A Home tab, Editing group
Find Ctrl+F Home tab, Editing group
Replace Ctrl+H Home tab, Editing group
 
PowerPoint 2010 File and Document Shortcuts
Command Keys Ribbon Location
New Ctrl+N File tab, New command
Open Ctrl+O File tab, Open command
Save Ctrl+S File tab, Save command
Print Ctrl+P File tab, Print command
Help F1 Help button at top right of Ribbon
New Slide Ctrl+M Home tab, New Slide command
 
PowerPoint 2010 Slide Show Shortcuts
To Do This . . . Use This . . .
Start a slide show F5
Advance to the next slide N
Perform the next animation Enter, Page Down, right arrow, down arrow, or spacebar
Go back to the previous slide P
Repeat the previous animation Page Up, left arrow, up arrow, or Backspace
Go to a specific slide Type the slide number and then press Enter
Display a black screen B
Display a white screen W
End a slide show Esc
Go to the next hidden slide H
Display a pen cursor Ctrl+P
Display an arrow cursor Ctrl+A
Hide the cursor Ctrl+H
 

PowerPoint 2013

Difference between PowerPoint 2010 and PowerPoint  2013

The new look of PowerPoint2013 show that it will be easier to create and share professional presentations with a range of new and improved features.  

New design themes

Easier inclusion of videos, or pictures to give a more professional edge to presentations. Easy access to a collection of new themes available via the start screen.
 

The ability to quickly change themes using theme variants.

Alignment Guides have been added that make it easier to align text boxes, graphics and shapes with text.

Merge Shapes tools -2013 includes Union, Combine, Fragment, Intersect, and Subtract tools making it easier for the user to merge two or more shapes into the shape required.

Improvements of presenter's and organization of the presentation.

  • The One click Slide Zoom allows the user to zoom in and out on diagram, or chart.
  • The addition of a presenter's Navigation Grid, making it easier for the presenter to switch slides within a sequence using a navigation grid that the audience cannot see.
  • The ability to easily project a presentation on a second screen using Auto-extend.

Collaboration with easier sharing and co-authoring.

  • The Reply Comment feature. PowerPoint 2013 makes it easier to add and track comments next to the relevant section of text. Everyone working on the presentation can follow the discussion easily and act on any suggestions.
  • Collaboration and Sharing. With Microsoft's emphasis on improved collaboration, the new default setting means that presentations are saved online to SkyDrive or SharePoint . This allows the author to send a link to the same file to everyone involved, complete with personalised viewing and editing permissions, so that everyone is working on the same version.
  • The PowerPoint Web App Co-authoringfeature via PowerPoint Web. 2013 makes it easier for several people to work on the same presentation at the same time from the desktop or in browser.

Difference between PowerPoint 2010 and PowerPoint 2007

2010's improvements and streamlined processes mean that your presentations are easier to create, edit and view. They also look better and are more accessible to your audience -whether the presentation is given in person or online.

Differences From 2007 to 2010
If you are currently using 2007, the 2010 differences include improved functionality and more design options with the enhanced Ribbon and Backstage view. There are new tools so you can easily include videos, music and screenshots in your presentation - and record your presentation to put it online or record it onto a DVD. There is easier access to collaborative working, allowing you to work with colleagues on presentations, whether you are in the office or out and about.

Differences From 2003 or earlier to 2010
If you are using an earlier versions of MS Office (2003 or earlier), the most significant visual change is the Ribbon and Backstage View. This replaces 2003's file menu to manage files, create presentations, edit, print and send them. The new tools in 2010 give you greater options with improved graphics and designs. A dramatic difference is the ability to collaborate on presentations - working with your colleagues on a presentation at the same time, and even uploading the final result for online presentations.

Upgraded Ribbon

The Ribbon replaces the file menus and toolbar with a visual layout of commands. These commands are organized into 8 tabs, making it easier for you to find the features you need. The most frequently used commands are now larger buttons making it easier to find them.

The 8 tabs in the 2010 PowerPoint Ribbon are: Home, Insert, Design, Transitions, Slide Show, Review and View. Within each of these 8 tabs there are Contextual tabs which will display the relevant commands for that main tab. This gives you a tidier workspace showing you the commands you need, and "hiding" the ones you don't need right now.

Fully Customizable Ribbon
You can customize your Ribbon fully in 2010 (this was not the case in 2007). So you can make your most frequently used commands more accessible on the Ribbon's tabs or even add new tabs. You can do this via  
Options in the Backstage View.

KeyTips Improved Access Keys (Shortcut keys)
These shortcuts open tabs in the Ribbon to access the commands you need (without using the mouse). You use Alt plus another key (or sequence of keys) to access the commands. The shortcut keys are shown on the screen (when you press Alt), so for example, you don't have to try and remember each shortcut key combination as you would, for example, in Office 2003.

Live Preview
This is a new tool that saves you time by allowing you to see the impact of applying an editing or formatting change to your selection. Then can chose the most suitable version for your presentation in one click.

Improved Backstage View

You can manage your PowerPoint files using the Backstage View, which you access via the File tab. This is where you to manage files, create presentations etc. It includes the most common commands and file information, media compatibility, performance, permission and version control.
The File tab replaces the Office button used in Office 2007, and the File menu in Office 2003.
When you are starting a new presentation, the Backstage View gives you built in templates and online templates from Office.com. This speeds up creating your new presentation by selecting a ready-made template, which you can customize to your needs (and you don't have to create them all from scratch).

Quick Access Toolbar
This gives you the commands you use on a regular basis - for example when your cursor is on some text in a presentation, it will show you the most relevant commands to work on it. You can to your quick access toolbar by clicking the drop down list to add additional commands.

Comparability Checker - Comparability with other Office Versions
This tool lets you save, open or edit a powerpoint presentation in 2003 or earlier versions of MS Office. You can also open a PowerPoint presentation from an earlier version of Office, and edit them within 2010. You can create, work on and save a 2010 presentation as a 2003 version, and the comparability checker will notify you (when you save it as a 2003 file) of any items that will not be compatible. For example, you lose some editing capability with shapes and SmartArt when you edit a 2010 PowerPoint presentation in Office 2003.

Accessibility Checker 2010
This tool makes it easier for you to check your presentation to identify and rectify any issues to ensure that your presentation is accessible to people with disabilities. The tool is located under File, then Info, then Check for Issues.

PowerPoint 2003 commands in PowerPoint 2010
Most of the 2003 shortcuts still work in 2010, but you will need to know the shortcut keys from memory (or a quick reference sheet). In 2003, Alt +E opened the edit menu and you could press the underlined letter to complete the action.

Image Editing, Audio clips, Animation and Video in PowerPoint

2010 has improved the inclusion and editing functions in PowerPoint for images, audio, animation and video.

Embed and edit Audio clips
This function has been improved from 2007. You can now embed audio clips from a range of sound files (and not just .wav as in PowerPoint 2007). You can also edit the audio clip using in-place editing.

Add, Edit and Embed videos to play them within your presentation
This is a great benefit in Office 2010. You can add images or videos to a presentation and edit within the program. This means that you don't need additional editing programs. You can edit using the Picture Tools tab which will appear when you select the image.

Improved animation
This allows you to add realistic movement to stationary objects via the Animations tab on the Ribbon. If you like the animation and want to apply it to other presentations, you can use the new animation painter.

Improved SmartArt graphics
The improved SmartArt graphics' options allow you to create editable illustrations, and add them to your SmartArt graphics (such as shapes and charts). You can add animation to your graphics, for example to show progression in sales on a chart. In 2010 there are more SmartArt diagrams for you to choose from.
Additional benefits include easier conversion of SmartArt to texts and shapes, and SmartArt to text - which can all be completed more easily than in previous Office versions.

Link to a video on a website
You can add bookmarks to your presentation any audio or video clips you are using in your presentation.
Add Screen Shots to your PowerPoint presentation
This is new to 2010 with the easy inclusion of screenshots within your presentation. For example, in previous versions of MS Office you would have to open up a program in a different window during a presentation to show a screen shot.

More Features to Improve PowerPoint Presentations

New Themes
2010 has more themes with corresponding colors, effects and fonts which can save you time when creating a new presentation or livening up an old one.

Improved Slide Transitions
2010 includes new special effects that can improve your presentation. The new transitions include 3D effects and dissolves, and you can control the timings more effectively than before for a sleek performance. So instead of fast, medium and slow in earlier versions, you now have control in seconds. The special effects from previous versions are still there, and they have been improved to look smoother.

Use your mouse as a laser pointer
You can do this in Slide Show View. Press Control and the left mouse button.

Organize your Presentation by Creating Sections
When you have a presentation that includes many slides, you can divide your presentation into sections to make navigation, sharing (and delivery) easier. You can apply this via the Home tab in the Slides group, under the Section button.

Merge and compare multiple edits in a single presentation
This is a new feature in 2010 that allows you to merge and compare multiple edits in one single presentation file. This is especially useful if you are working on a presentation with one or more colleagues. The tool allows you to review and compare different versions side by side, and then accept or reject the changes in one version.

Add a small section about Enhanced Picture formatting such as Color Saturation and new effects.
Enhanced Slide Master view(from 2003)

Office Auto Revisions Settings

These setting allows you to save different versions of your presentation so you can recover all or part of your earlier versions.

Using AutoSave
You can use this tool, if you want your presentation to be saved automatically when you are making changes, so you don't have to remember to do it.

AutoRecover
This is a useful tool if you have forgotten to save your presentation manually - you need to select this option in order to have it available for when you need it.

AutoRevision
This tool will let you go back to an earlier or later version of your presentation. This is also a useful tool to have set up in case someone overwrites your presentation, and you want to go back to your original version.

Co-Authoring, Managing and Collaborating with Colleagues

Co-authoring allows two or more people to create or work on a presentation online, at the same time, using Sharepoint/Office 365. This give you and your colleagues the option for more flexible working.
Access your presentation outside of the office
You can access your presentation to work on it using the PowerPoint Web Apps.

Work on your presentation from your phone
with PowerPoint Mobile 2010 for Windows Phone 7.

Save to Web (SkyDrive)
2010 gives you the capability to upload your file directly to SkyDrive. From there you and your colleagues can view your presentation in a browser with the PowerPoint Web App (where you can complete some editing features) or for fuller editing functions, launch the file in PowerPoint and edit it in the program.

Work with several PowerPoint presentation files at the same time in different windows (Single Document Interface)
This feature lets you have the ribbon and editing tools available on each presentation you have open.

The Delivery and Sharing of Presentations

2010 gives you greater flexibility in how you show and share your presentations. This makes it easier for your audience to view it, at a time that suits them. The added bonus is that your audience does not have to have PowerPoint installed on their computers in order to view your presentation.

Turn your presentation into a video
In 2010, you have the ability to turn your presentation into a video (including features such as narration, sounds, transitions and slide timings). The video can be played in Windows Media player.

Broadcast your slide show online
If you prefer to broadcast your slide show online, you can upload your presentation to the web. You can use Broadcast Slide Show to show your presentations in the client's browser. This function is located within the Backstage view in the Share area.

Save your presentation as a DVD
For those who would like a DVD version, this can be a fantastic option, and you can easily add all those extra features such as narration, includes an embedded video, the video at the right point in the presentation (and you don't need to control it).
 

Excel Tutorials

Spreadsheet Print Options in Excel 2007

For printing in spreadsheet programs like Excel is a bit different than printing in some other programs, such as a word processor. The main differences is that Excel 2007 has five locations in the program that contain print-related options.

Excel Tutorials how to Print
 
This Microsoft Excel tutorial will also cover print options available under the Page Layout tab of the ribbon in Excel 2007.

We found the Ribbon is the strip of buttons and icons located above the work area in Excel 2007 and Excel 2010. The Ribbon replaces the menus and toolbars found in earlier versions of Excel. Above the Ribbon are a number of tabs, such as Home, Insert, and Page Layout. Clicking on a tab displays the options located in this section of the ribbon. 

For example, when Excel 2007 or 2010 opens, the options under the Home tab are displayed (see image to the right). These options are grouped according to their function - such as Clipboard (includes cut, copy, and paste options), and Font (includes current font, font size, bold, italic, and underline options).

Clicking on an option on the ribbon may lead to further options contained in a Contextual Menu that relate specifically to the option chosen.

Excel 2010 Print Options


Tutorial on Excel

Tutorial on Excel merge cells

Now let us study the spreadsheet below:

Tutorial on Excel 2010


Look at Row 1, you'll see that the "Shopping Bill" heading stretches across three cells. This is not three separate cells, with a color change for each individual cell. The A1, B1 and C1 cells were merged. To merge cells, do the following.
  • Type the words Shopping Bill into cell A1 of a spreadsheet
  • Highlight the cells A1, B1 and C1
  • On the Alignment panel of the Excel Ribbon, locate the "Merge and Center" item:


  • Click the down arrow to see the following options:
 

Now Click on "Merge and Center". Your three cells will then become one - A1, to be exact! 


Tutorial for Excel

Tutorial for Excel 2010

We can use find feature of Excel 2010 e to quickly find specific text. We also can use Excel's replace feature to quickly find specific text and replace it with other texts.

Find:
To quickly find specific text, execute the following steps.
On the Home tab, click Find & Select, Find

Image of Excel 2010 Tutorial
Excel 2010 Tutorial

The 'Find and Replace' dialog box appears.
Type the text you want to find. For example, type Brown.
Click on Find Next.


Excel selects the first occurrence of the specific text.
Click on 'Find Next' if this is not the record you are looking for.
Excel selects the second occurrence of the specific text.
To get a list of all the occurrences of the specific text, click on 'Find All' in the dialog box.


Replace:
To quickly find specific text and replace it with other text, execute the following steps.
On the Home tab, click Find & Select, Replace.


The 'Find and Replace' dialog box appears (with the Replace tab selected).
Type the text you want to find (Brown) and replace it with (Brownhill).
Click on Find Next.

Excel selects the first occurrence of the specific text. No replacement has been made yet.

Click on 'Replace' if you want to make a single replacement of an occurrence.

Click on 'Replace all' to replace all occurrences of the text.
Did you find this information helpful? Show your appreciation, vote for us.
 

Excel 2010 Formulas

Excel 2010 using simple Formulas

Image of Excel 2010 Formulas
Excel 2010 Formulas
Excel can be used to calculate numerical information. In this lesson you will learn how to create simple formulas in Excel to add, subtract, multiply, and divide values in a workbook. Also, you will learn the various ways you can use cell references to make working with formulas easier and more efficient.

A formula is an equation that performs a calculation. Like a calculator, Excel can execute formulas that add, subtract, multiply, and divide.
One of the most useful features of Excel is its ability to calculate using a cell address to represent the value in a cell. This is called using a cell reference.
In order to maximize the capabilities of Excel, it is important to understand how to create simple formulas and use cell references.

Excel uses standard operators for equations, such as a plus sign for addition (+), a minus sign for subtraction (-), an asterisk for multiplication (*), a forward slash for division (/), and a caret (^) for exponents.

The key thing to remember when writing formulas for Excel is that all formulas must begin with an equal sign (=). This is because the cell contains, or is equal to, the formula and its value.

To Create a Simple Formula in Excel

  1. Select the cell where the answer will appear (B4, for example).
    Selecting cell B4  
    Selecting cell B4
     
  2. Type the equal sign (=).
  3. Type in the formula you want Excel to calculate. For example, "75/250".
    Entering formula in B4  
    Entering formula in B4
     
  4. Press Enter. The formula will be calculated and the value will be displayed in the cell.
    Result in B4  
    Result in B4
 

Excel 2010 AutoFit

AutoFit Column Widths and Row Heights in Excel 2010

Changing Column Widths and Row Heights in Excel

There are limits to how big and small you can make columns and rows in Excel. Column widths and row heights with a value of zero are hidden in an Excel worksheet. This is the equivalent to using the hide column or row feature.

Columns can have a maximum width of 255. This number represents the maximum number of characters a column can hold at the standard font size. Changing the font, the font size, and adding other characteristics to the font such as italics and bolding greatly reduce the maximum number of characters a column can hold. The default size of an Excel column is 8.43, which correlates to 64 pixels.

Rows can have a maximum height of 409. This number represents the how many 1/72nds of an inch the row can hold. The default size of an Excel row is 15, which correlates to 20 pixels or about 1/5th of an inch.

Using Excel’s AutoFit Feature

Suppose in your Excel worksheet you have text in the A1 cell that extends beyond the 8.43 (64 pixels) default column width. Notice that although the column’s width cannot contain the length of the text, Excel allows the text to spill over into adjacent columns.

Image of Excel 2010 AutoFit Tutorial
Excel 2010 AutoFit Tutorial

Select Column A, click on the Home tab on the Ribbon, and locate a section of the Ribbon almost all the way to the right labeled Cells. Click on the button titled Format and locate a section of the menu labeled Cell Size. Notice that there are three options for changing the width of a column.

Column Width – This option lets you manually change the width of a column by typing in a number. This option isn’t useful because you can more easily accomplish the same thing by simply dragging the column to your desired size.

AutoFit Column Width – This is the option we want. This option will change the size of the column to a new size depending on the length of the contents of the cell in the column that takes up the most space.

Default Width – This option doesn’t actually change the width of any columns; it simply changes the default width of the columns for a particular worksheet.


On the Format button’s menu, select AutoFit Column Width and notice that the width of Column A has changed to contain the length of the text in the A1 cell.

Using Excel 2010’s AutoFit feature you can automatically change the width of columns and the height of rows in a worksheet to accommodate different sized text without having to manually change the width and height values. A real time saver, the AutoFit feature can also make data in your worksheet easier to access and read.


Excel 2010 Row height

Excel 2010 Modify the Row Height


Position the cursor over the row line so that the white cross Cursor becomes a double arrow Double-arrow
Image of Excel 2010 Row height
Excel 2010 Row height
Positioning the mouse over the row line
Click and drag the row downward to increase the row height or upward decrease the row height. 
 Increasing the row height 

Increasing the row height 
Release the mouse. The height of each selected row will be changed in your worksheet.
Increased row height

To Set Row Height with a Specific Measurement:

Select the rows you want to modify.
Click the Format command on the Home tab. The format drop-down menu appears
 Select Row Height.
 Increasing the column width  

The Row Height dialog box
Increasing the column width
appears. Enter a specific measurement.

Increasing row height to 60 pixels  

Increasing row height to 60 pixels

Click OK. The selected rows heights will be changed in your spreadsheet.

Select AutoFit Row Height from the format drop-down menu and Excel will automatically adjust each selected row so that all the text will fit.
 
 
Support : Website Designed | LMSO Group | Organized By
Copyright © 2013. Learning MS Office - All Rights Reserved
Tutorials Developed by LMSO Experts Published by LMSO Group
Proudly powered by LMSO Group