Word Tutorial: Control bullets in Word 2007 and Word 2010
Controlling bullets, don't use the bullets button on the ribbon. That will drive you crazy. Instead, create a list style to manage the bullets, and then apply
the built-in paragraph styles List Bullet, List Bullet 2, List Bullet 3
etc to your text. It's actually not hard to do this, once you get the hang of it. After
you've done this a couple of times it will take less time to set up
your bullets than it will to read this article.
Word has five built-in paragraph styles named List Bullet, List Bullet 2, List Bullet 3 etc.
We're going to use the List Bullet paragraph style for bullets that begin at the far left. Bullets that have to be indented use List Bullet 2. Bullets that are indented a bit more are List Bullet 3. Etc. Like this:
- Level one bullets use style List Bullet
- Level two bullets use style List Bullet 2
- Level three bullets use style List Bullet 3
- Level four bullets use style List Bullet 4
- And finally, level five bullets use style List Bullet 5
- Level four bullets use style List Bullet 4
- Level three bullets use style List Bullet 3
- Level two bullets use style List Bullet 2
How to create a new list style
To create your list style, on the Home tab, in the Paragraph group, click the Multilevel list menu and choose Define New List Style (Figure 2).
 |
| Word Tutorial |
On the Multilevel list menu, choose the Define New List Style option.
In the Define New List Style dialog (Figure 3), do (only) two things:
- Give your list style a name.
Hint: Give it a plural name. That makes it clear that this is a list style that's controlling more than one paragraph style. And, give it a name directly related to the paragraph styles you're going to use. We're going to use paragraph styles List Bullet, List Bullet 2, List Bullet 3 etc. So I suggest naming the list style as ListBullets. - On the Format menu, click Numbering. (Why 'Numbering' when we're dealing with bullets? Because to Word, bullets and numbering are inextricably linked.)
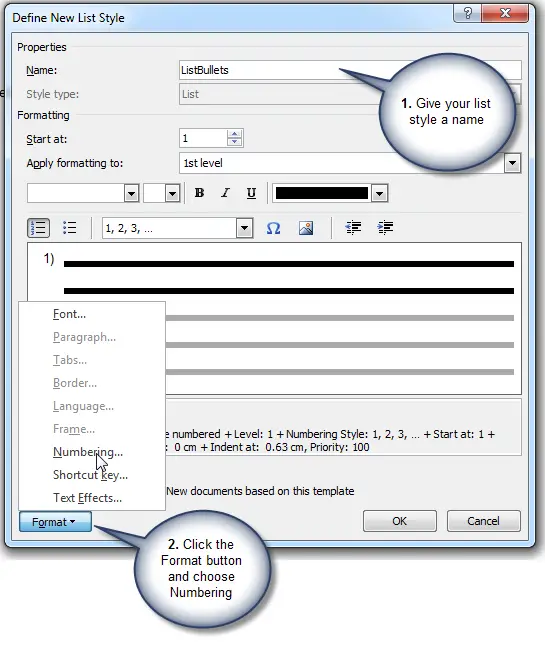
In the Define New List Style dialog, give your list style a name and then click Format > Numbering
We're now in the Modify Multilevel List dialog box (Figure 5). The
list style is the co-ordinating mechanism for the whole "set" of
paragraph styles we'll use. So we set up all levels of bullets in this
one dialog box.For the simplest set of ordinary bullets:
- In the Modify multilevel list dialog, click the More button.
- Attach the List Bullet paragraph styles to the first 5 levels in the list style. To do that:
- In the 'Click level to modify' list, select level 1. In the 'Link level to style' box, choose List Bullet. That attaches paragraph style List Bullet to level 1 of the list style.
-
In the 'Click level to modify' list, select level 2 and attach style
List Bullet 2. And attach List Bullet 3 to level 3, List Bullet 4 to
level 4 and List Bullet 5 to level 5.
(Keyboard users will experience a bug in this dialog box that's been there for 10 years or more: if you use the keyboard to attach your styles, typing the names of the styles as you go, you'll have to go back and re-attach List Bullet to Level 1).
- Now we tell Word about the bullets: round? square? arrows?
- In the 'Click level to modify' list, click level 1. 'In the Number style for this level' box, scroll down the list and choose the bullet you want.
- In the 'Click level to modify' list, select level 2. And choose your bullet for level 2. And so on down to level 5.
- For each of levels 6 to 9
- choose the level in the 'Click level to modify' list
- set the 'Number Style for this level' to "(none") and
- delete anything in the 'Enter formatting for number' box.
- The default indents are actually quite reasonable. If you prefer to change them, then you have two choices. The easy way is to click the "Set for all levels" button. You'll see the Set for All levels dialog
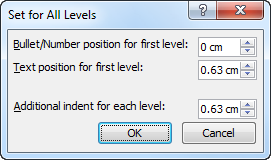
Use the Set for All levels dialog to manage indents for your bullets
My finished settings look like the Figure
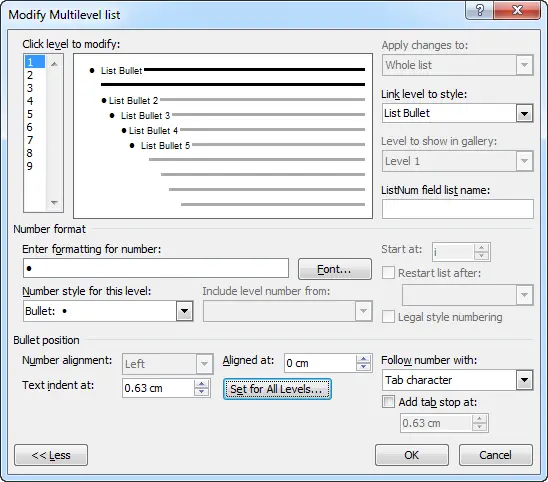
The finished settings in the Modify Multilevel List dialog
OK, OK back to your document.


