Excel 2010 Tutorial
We know that Excel 2010 is a spreadsheet software in the new Microsoft 2010 Office
Suite. Excel allows us to store, manipulate and analyze data in
organized workbooks for home and business tasks. New innovations in
Excel 2010 include the enhanced data viewing features of Sparklines and
Slicers.
Modifying Columns
 When we open a new, blank workbook, the cells are set to a default size.You
do have the ability to modify cells, and to insert and delete columns,
rows, and cells, as needed. In this lesson, you will learn how to change row height and column width; insert and delete rows and columns; wrap text in a cell; and merge cells.
Modify Column Width
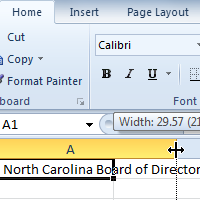
- Position your mouse over the column line in the column heading so that the white cross
 becomes a double arrow
 .
.
 Positioning mouse over the column line
 - Click and drag the column to the right to increase the column width or to the left to decrease the column width.
 Increasing the column width
 - Release the mouse. The column width will be changed in your spreadsheet.
 Increased column width
To Set Column Width with a Specific Measurement:
- Select the columns you want to modify.
- Click the Format command on the Home tab. The format drop-down menu appears.
- Select Column Width.
 Increasing the column width
 - The Column Width dialog box appears. Enter a specific measurement.
 Increasing column width to 258 pixels
 - Click OK. The width of each selected column will be changed in your worksheet.
Tips: Select AutoFit Column Width from the format drop-down menu and Excel will automatically adjust each selected column so that all the text will fit.
Visit this page for For modifying Excel 2010 Row .


